
As you've probably already noticed, the Windows 7 Start menu’s taskbar components are slightly different from Windows Vista’s. And there is nothing strange in this, since the developers took only the best and added additional functionality.
As before, you can customize the appearance of these useful options from the Control Panel -> Taskbar and Start Menu.
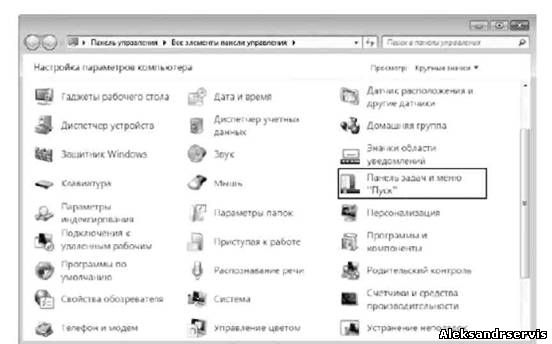
All properties of the mentioned options are grouped into three tabs - Taskbar, Start Menu and Toolbar. Let's take a closer look at these tabs.
Taskbar
Taskbar is a thin strip that runs across the bottom of desktop. It is used to reflect running programs’ icons. The Start icon is also located on the Taskbar. In addition, it may be used for a quick access to useful programs and files by simply pinning them. It has been used since the earliest versions of the Windows operating system, and the developers of Windows 7 did not deviate from traditions, but only modified and improved the Taskbar, adding functionality to it to improve usability.
And here are some parameters that affect the appearance and features of Taskbar:
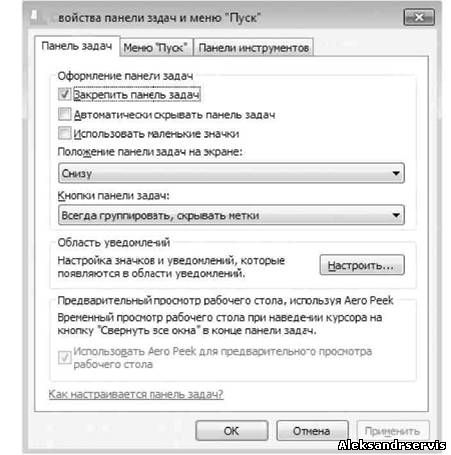
Lock the taskbar - if this option is marked, the taskbar will be located in the place where it is currently located. At the same time, it is fixed and it is impossible to displace, collapse or stretch it. If you are experiencing difficulty with mouse control, which periodically leads to the movement of the Taskbar at the most crucial and unexpected moment, then the best solution in this case would be to use this parameter, especially since this choice will not lead to anything negative.
Automatically hide the taskbar - if having the largest possible work space is important to you, then use this option. It allows you to hide the Taskbar from the screen and show it only when the cursor moves to the bottom edge of the screen.
Use small taskbar buttons – with the help of this option you can minimize running programs’ icon size. It enlarges the workspace and frees space on the Taskbar which allows locating more icons of running and pinned programs.
Taskbar location on the screen - allows you to place the Taskbar near any edge of the screen. Values from the list are used to select the option for placing the Taskbar. You can change the location of the Taskbar without using the Taskbar Properties window and the Start menu. In order to do this, you just need to drag the taskbar with the mouse.
Combine taskbar buttons – this list contains options that affect the appearance of running tasks and programs. The following variants are available:
■ Always group, hide labels - this mode is activated by default and allows you to maximize free space on the taskbar by grouping similar program icons and the absence of labels for the name of the icons. For example, if you open three browser windows at once, they are all will be grouped into one icon, while it will change slightly and several additional lines will appear on the right side of it, giving the impression of overlapping several icons one on top of the other. In relation to the browser, this parameter is very convenient, especially if you like to open a dozen identical windows instead of working with bookmarks. The effect of using this option is further enhanced if you apply the Aero visual style. At the same time, reduced copies of windows are displayed.
■ Group when taskbar is full - icons are grouped only if free space on the taskbar is running out. In this case, the program icon is labeled.
■ Never - no grouping is applied and icons are positioned as usual with tooltips.
Use Aero Peek to preview Desktop - If selected, the contents of the Desktop can be previewed by hovering over the minimize button in the lower right corner of the screen. In this case, the windows of all programs that are currently on the screen become transparent and you can see what is happening on the desktop.
On the same tab, in the Notification area, there is a Customize button that allows you to customize icons in the notification area (read more about customizing icons).
Customizing the Start Menu
Compared to Windows Vista, the Windows 7 Start menu’s look has remained almost unchanged, except a few minor points. The Start button now looks absolutely complete and has an animated effect: when you hover over a button, it is highlighted, like all icons on toolbar as well. The search bar looks like one piece with the menu, which makes it more attractive. The appearance of menu items has become more attractive and contrasting.
The Shutdown button has changed as well. Unlike Windows Vista, the button received a label that uniquely describes its actions. Thus, by default, clicking on the button will shutdown and turn off the computer, as evidenced by the inscription on the Shutdown button. An additional menu is used to access the rest of the actions.
There are many options that affect the appearance of the Start menu and the items in it.
As mentioned earlier, the options for customizing the appearance of the Start menu are located on the Start menu tab.
Start
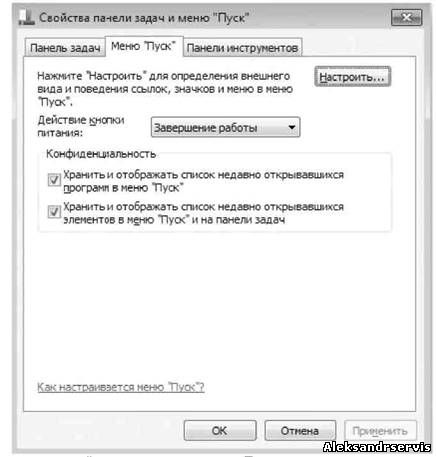
Since all the parameters did not fit on the tab, most of them open in an additional window. The tab itself contains the following parameters:
Power button action - with this setting, you can customize the response of pressing the power button in the Start menu. By default, pressing the button shuts down and turns off the computer.
The following options are also available: Switch user, Log out, Lock and Restart.
Privacy - under this loud name, there are only parameters that can be used to configure whether to display or hide recently opened documents and applications on the left side of the menu. This options allows you to quickly launch the desired programs or go to work with documents. If you decide to play a super-agent or there really are certain security requirements, then by unchecking the checkboxes in this area, you will thereby remove links to documents and programs that you have had access to recently.
In order to display most of the options, click the Customize button. This will open a window that contains groups of parameters divided into different areas.
Customize: This parameter allows you to control how the Administration group is displayed. The following options are possible.
■ Don't display this item - in this case, access to the Administration group is possible only using the Control Panel.
■ Display in the All Programs menu - the group will appear on the left side of the Start menu as a folder.
■ Display in All Programs and Start Menu - the Administrative Tools group will be displayed both on the left and on the right side of the Start menu, while the group on the right side of the menu will automatically expand when you hover over it.
Video: This option allows you to customize the display of the Video group on the right side of the Start menu. The following options are possible.
■ Don't display this item - in this case, you can get to the Video group from Windows Explorer or by another similar method.
■ Display as a menu - the group will appear on the right side of the Start menu as a folder, which will automatically open when you hover over it.
■ Display as a link - the group will appear on the right side of the Start menu as a simple link. When you select it, an additional window will open with the contents of the Video folder.
Highlight recently installed programs. If you want the operating system to automatically notify you that a new program has appeared in the Start menu, check this box. In this case, when you open the Start menu, you will see a corresponding pop-up message, and the program or program folder will be highlighted in gray. On the other hand, highlighting the contents of a folder with an installed program is sometimes quite annoying, because until all the components of the folder are open at least once, the folder will always be highlighted. Agree that a folder containing a dozen links, only one of which is really needed, should not be constantly highlighted. It would be quite sufficient to highlight only the folder itself, so that its contents are not affected, and then only until at least one of the links is activated.
Documents: This parameter controls the display of the document folder, which is actually a library and can contain any number of documents or any other folders. The parameter can take one of three values.
■ Don't display this item - in this case, you can get to the Documents group from the Explorer or in another similar way.
■ Display as a menu - in this mode, documents appear on the right side of the Start menu and expand when you hover over the pointer group.
■ Display as a link - the group with documents is displayed on the right side of the Start menu, while the contents of the group are opened in a separate window.
Home group: If you are connected to a homegroup, then the possibilities of this parameter will appeal to you. If the option is activated, the Homegroup folder appears on the right side of the Start menu, the selection of which leads to the opening of the folder of the same name. This allows you to quickly manage resources on your home network without having to launch the Control Panel and the Homegroup mechanism.
Games: If you like to play standard Windows games, use this option and pin the Games folder in the Start menu for quicker access to them. As usual, there are three options available.
■ Don't display this item - even if this item is selected, do not worry - nothing will happen to the games. They can be started using the All Programs menu.
■ Display as a menu - enabling this setting displays the Games folder on the right side of the Start menu as a drop-down menu.
■ Display as a link - the group with documents is displayed on the right side of the Start menu. The contents of the group are then opened in a separate window.
Images: If you often work with images located both on your computer and on the network, then the ability to quickly open the library of drawings will come in handy. These options are available.
■ Don't display this item - access to the Pictures folder in this mode is possible only by means of the Explorer.
■ Display as a menu - displays the Pictures folder on the right side of the Start menu as a drop-down menu.
■ Display as a link - shows the Pictures folder on the right side of the Start menu as a link that opens in a separate window.
Search other files and libraries: Using this parameter, you can influence the speed of searching for the information you need. Depending on which mode you specify, the list of places where you need to search for information increases or decreases, which affects the speed of obtaining a search result. The following setting options are possible.
■ Search in shared folders - if you want to search for files in the folders used for storing shared resources, check this box. In this case, the search speed is reduced, but a wider search area is covered.
■ Don't search - speeds up the search for data, but reduces the chance of finding it if the data is located in shared folders and libraries.
■ Don't search in shared folders - the most optimal option, which allows you to search for data everywhere, except for public folders.
Search for Control Panel programs and features. This parameter is also related to file search. If you check this box, then the search will also be carried out among the components of the Control Panel.
Run command: The Run command was present on the Start menu of almost every Windows operating system, but by default it is not on the menu in Windows 7. If you use this command often, check this box and then it will appear in the Start menu.
Computer: If you don't want to load your Desktop with unnecessary icons, or just don't want to display the Computer icon, you can add it to the Start menu. Such options are possible.
■ Don't display this item - use this mode if you already have a Computer icon on your desktop, or if you are used to accessing drives and files using Explorer.
■ Display as a menu - if you select this check box, the Computer folder appears as a drop-down menu on the right side of the Start menu.
■ Display as a link - the Computer folder appears on the right side of the Start menu, and the contents of the folder open in a separate window.
Large icons: A useful option that, when unchecked, reduces the size of the icons in the list of the most run programs that appear on the left side of the Start menu. In this case, more icons can fit. If you like large icons more, even if there are fewer of them, then it is better to leave this checkbox selected.
Personal folder: The personal folder is a repository of links to all the resources that you work with and which you yourself have placed there. These include links to downloads, favorites, music, contacts, videos, and more. With this setting, you can control the display of your personal folder in the Start menu. If the mode of displaying a private folder is selected, then in the Start menu it will be shown under the name of your account, for example, Alex. Three standard settings are available.
■ Don't display this item - if you use this mode, you can access your private folder from Explorer or using the Computer component.
■ Display as a menu.
■ Display as a link.
Favorites menu: This option allows you to show or hide the Favorites group as a drop-down menu on the right side of the Start menu. If you want the selected addresses to be able to open without first launching the browser, then activate this parameter.
Music: This parameter adjusts the display of the Music folder. The parameter can take the following values.
■ Don't display this item - if you don't like listening to music, it doesn't make sense to display the Music group. To do this, check this box.
■ Display as a menu - using this mode is fraught with the fact that displaying the menu with titles may take a long time if the number of titles is large enough and there is no division into folders.
■ Display as a link - the best option is to open the Music folder in a separate window.
Recent documents: This is a very useful option that allows you to display a menu with links to documents that you have worked with recently. This allows you to speed up the launch of such documents as much as possible.
Control Panel: The Control Panel is the main operating system management tool that you often have to use. With this option, you can customize the display of the Control Panel on the right side of the Start menu. As usual, there are three customization options available.
■ Don't display this item - this is an extremely undesirable setting, as the link to the Control Panel will not be displayed in the Start menu. At the same time, it will be very difficult to get to the Control Panel, since the link to it is found only in some system components.
■ Display as a menu - the Control panel appears as a drop-down menu, making it easier and faster to access its components.
■ Display as a link - The best option is to open the Control Panel in a separate window.
□ Connect to - this parameter is used to work with the network: it allows you to display a list of all found networks to which you can try to connect.
□ Default programs - when enabled, a link to Default Programs appears on the right side of the Start menu. When you click on it, a system mechanism opens, with which you can configure various default settings: programs, autorun, file associations, etc.
□ Allow context menus and object dragging - this is a very useful setting that allows you to access the context menus of the Start menu items. In addition, it becomes possible to drag and drop items, that is, you can freely move, for example, a program icon or other component to the Desktop. In a similar way, you can add new items to the Start menu: pulled and released.
□ Expand the menu on hover - if you do not like the fact that the menus that are on the Start menu open unnecessarily when you accidentally hovered over them, then disable this feature by unchecking the described checkbox.
□ Network - if you often go to the network environment to get to a particular computer in order to use or view its shared resources, then this parameter will help you speed up this process. If the option is activated, a corresponding link will appear on the right side of the Start menu. On the other hand, if you already have a Network icon on your Desktop, there is no point in adding a similar icon to the Start menu.
□ Sort the "All Programs" menu by name - when the number of programs installed in the operating system becomes large enough, it becomes rather difficult to find the desired folder with the program or program in the All Programs menu. Using this parameter, you can find the object faster, since all folders and programs will be sorted.
□ Help - do you use Windows help frequently? If so, check the box and the Help and Support link appears at the bottom right of the Start menu. On the other hand, why load the Start menu with unnecessary items when the help system can be launched by pressing F1?
□ TV recordings - with this option, you can customize the display of the TV recording folder, which will speed up access to them. As usual, there are three customization options.
■ Don't display this item - in this case, you can open the folder with TV recordings in any available way, for example, using Explorer or starting Windows Media Center.
■ Display as a menu - the TV recording folder appears as a drop-down menu, making it easier and faster to access its components.
■ Display as a link - allows you to open the folder with TV recordings in a separate window.
□ Devices and printers - if this box is not checked, access to connected printers, faxes, and other similar devices will speed up because a link appears on the right side of the menu to open the required window.
□ Files to download - this parameter is used to customize the display of the Downloads folder. Three modes of operation are possible, similar to those described above.
■ Don't display this item.
■ Display as a menu.
■ Display as a link.
In addition to the mentioned above, there are two more parameters that are responsible for displaying a list of recently used programs and documents. With these options, you can specify the number of entries in these lists, thereby adjusting the height of the Start menu. For example, if you first disable the Large icons option (see above) and set the number of programs to 15 or even 20, links to 20 programs will appear in the Start menu. This will not change the size of the menu itself.
Toolbars
Like earlier versions of the operating system, Windows 7 also lets you work with toolbars to quickly launch programs or access resources. The number of such panels is limited only by your needs. In addition, system panels can also be controlled using the options on the Toolbars tab.
Customize the display of toolbars: simply select the checkbox next to the names of the panels you need, click the Apply button, and they will appear on the Taskbar.

Address: Displays an input line for the address of a web resource, which allows you to quickly load the desired web page in an automatically opening browser window.
□ Links. Shows a list with links that you can use to quickly navigate to the desired web resources.
□ Tablet PC Input Panel. Displays a panel for entering link using a stylus or mouse.
□ Desktop. Shows desktop icons and some additional icons that do not appear on the desktop.
You can add a new toolbar the following way: Right-click on the Taskbar, select “Panels -> Create toolbar” in the menu that appears, and in the window that opens, specify the location of the folder whose objects the created panel should display. As a result, a new panel with the name of the folder to which it is linked will appear on the right side of the Taskbar. In addition, a link to it will appear in the window, which in the future will allow you to quickly control its display.
Notification area
As in previous versions of the operating system, Windows 7 also has a notification area that is used to display icons for programs and system components.
Any program that “thinks” that its icon should be in the notification area has no hesitation in placing it there. But is this program really that useful and is it really important to have its icon in the notification area?
As before, it is up to user to decide whether to display these icons, but, unlike earlier versions of the operating system, Windows 7 initially hides all such icons, with the exception of the icons of some important system mechanisms. And if you decide that any program icon should still be displayed in the notification area, you will have to inform the system about it.
To customize the notification area, use the system mechanism Notification area icons, which was already mentioned above. If you want to customize the display of icons, you need to open the Windows Control Panel, find the specified mechanism on it and launch it.
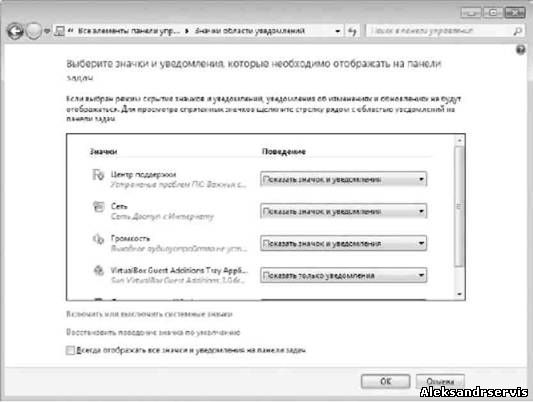
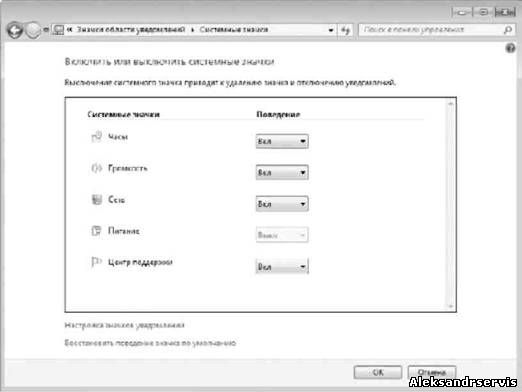
As a result, the contents of the window will look as shown on the screenshot. In the central part of the window there is a list of programs and applications whose icons tend to get into the notification area.
You can choose from three options for the operating system's behavior.
□ Show icon and notification - In this mode, both the program icon itself and pop-up messages that the program can use to communicate with the user are shown.
□ Hide icon and notifications - In this mode, neither the program icon itself nor possible program messages will be displayed.
□ Show only notifications. This mode provides for displaying only program messages, which is the most optimal, since the user will see all the necessary messages, while saving space in the notification area. In this case, access to the program icon can always be obtained by displaying hidden icons.
Thus, your task is to determine which icons or messages of programs you want to see, and accordingly go through the entire list of applications and indicate how the operating system should respond to the program's request to install and display the icon.
Windows 7 makes a distinction between icons for programs and system components, but it is much more loyal to the latter.
If you need to correct the ways system component icons are displayed, then follow the Enable or Disable system icons link at the bottom of the window. As a result, the contents of the window will change, and now system mechanisms will take the place of programs.
System icons can only be hidden or shown, for which values from the list with the inscriptions On and Off are used. Later, to see the hidden icons, you need to click on the arrow button in the notification area.
There is one more way to hide or show icons, whether they are application icons or system icons. If you want to hide an icon, just drag it to the arrow button that is used to access the hidden icons. You can set the icon to be displayed permanently the same way: you need to reveal hidden icons and drag the ones you need to the notification area. Some may find it interesting and useful to be able to organize the icons. In order to do this, simply drag the icon where you want in the notification area. When this happens, a vertical separator appears that indicates the future position of the icon.
Adding shortcuts and folders to the task panel
As you already know, Windows 7 also has a Quick Launch bar on the Taskbar. Although it looks different than the similar panel in Windows XP or Windows Vista, nevertheless, it perfectly fulfills its functions, and you may well use it for your purposes. Over time, the desktop becomes cluttered with a large number of shortcuts and folders and it becomes difficult to figure out what is where. Partially, creating additional toolbars or grouping shortcuts into additional folders helps, but then another problem arises - you need to remember in which folder this or that program shortcut is located.
Many users place only the most necessary shortcuts on the desktop, and shortcuts to programs that are accessed most often on the "Quick Launch". Windows 7 also has a quick launch bar, so these users don't have to break their traditions. Adding a program shortcut to the Quick Launch does not cause any problems - you just need to drag the shortcut to it. But if you try to do the same with a folder shortcut, you will run into a problem, since there is no standard way to do this. However, nothing is impossible! Below we will show you the way to place any shortcuts and folders on the Quick Launch.
Adding shortcuts
You can add a shortcut to the taskbar in different ways. The first is to use the file context menu. So, if you want to add a shortcut that is located on the Desktop, then right-click on the shortcut and select "Pin to taskbar". The same can be done with any file using Windows Explorer.
These actions are enough for the program or file icon to appear on the Quick Launch bar of the Taskbar. Another way is even simpler than the previous one: to pin the desired shortcut, simply drag it to the desired place on the taskbar. At the same time, note that you only need to release the shortcut when the Pin to taskbar prompt appears. If you want to do the opposite - to remove the icon from the Taskbar, right-click on the icon and in the menu that appears, select Remove program from the taskbar.
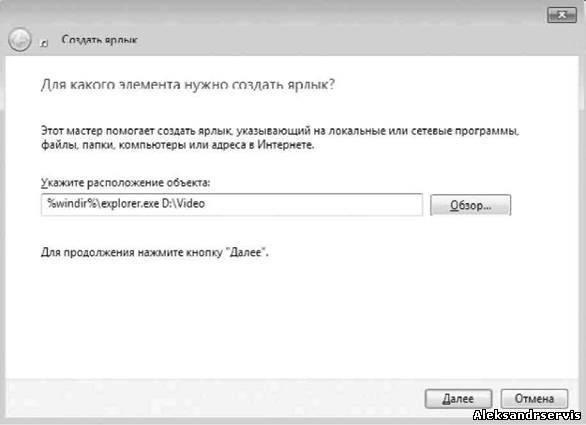
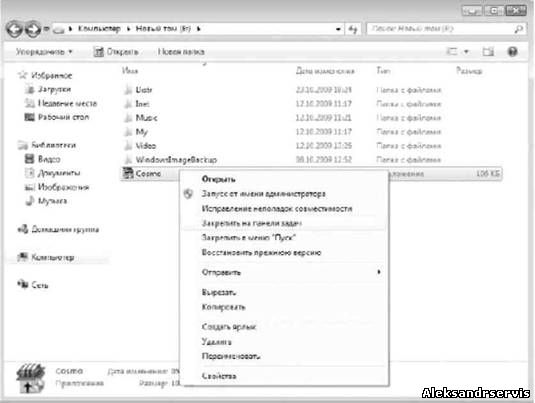
Since there is no "Pin to taskbar" option in the context menu of the folder, you will not be able to use the above method in the case of a folder. However, there is one trick that will allow you to achieve the desired effect, although in a non-standard way: Let's say you want to add a video folder to the Taskbar, which is located on the D: drive and is called Video. Right-click on a icon'free area free on the Desktop, in the menu that appears, select "New -> Shortcut". This will bring up a window with a command line and a "Browse" button. Type in the line:% windir% \ explorer.exe D: \ Video and click "Next".
After that, a window will appear in which you need to specify the name of the shortcut. Windows suggests the name "explorer", which clearly does not correspond to the contents of the folder, so change this name to "Video" and click the "Finish" button. As a result, a Video shortcut will appear on the Desktop, with the pinning command we need in the context menu. Unfortunately, the operating system does not quite accept the described method of creating a shortcut to a folder, so the icon of the shortcut we created looks similar to the icon of Windows Explorer. You can, of course, leave everything as it is, but then on the taskbar you will have two identical icons - Windows Explorer and the Video folder.
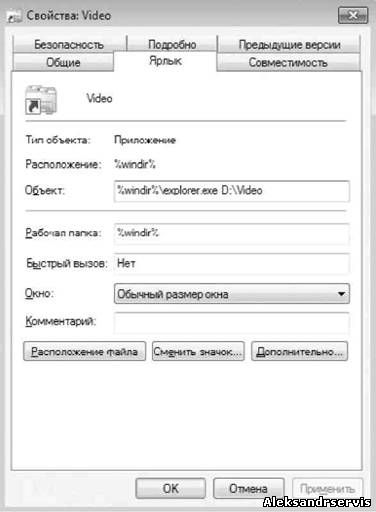
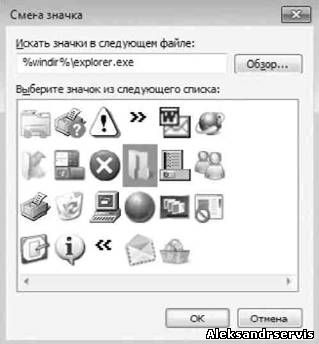
If you want to change the icon for this shortcut it can be done in a very simple way (just like in earlier versions of the Windows operating system): right-click on the "Video" shortcut and select "Properties" from the menu that appears. As a result, the shortcut properties window will open, in which you need to go to the "Shortcut" tab and click the "Change icon" button.
A window will appear with a list of different icons found in the Windows Explorer executable file. You can choose any suitable icon in this list, for example, a folder icon. Alternatively, you can specify any other executable file that contains other icons and choose the one you like best. To do this, use the "Browse" button. With the icon selected, click "OK" to close the current window, and "OK" again to close the shortcut properties window.
Now, when the shortcut is ready to be added, right-click on it and select "Pin to taskbar" from the menu that appears. After that, you can safely remove the shortcut from the Desktop and use the icon on the taskbar.
A detailed summary of all the ways to personalize the Start menu and taskbar in Windows 10.


 Windows 7. How to customize the Taskbar and Start Menu